![[SoundStage!]](../sslogo3.gif) D-I-Why & How D-I-Why & HowBack-Issue Article |
|||||||||
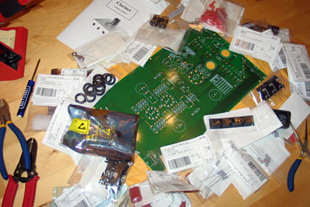
October 2007 Introducing "D-I-Why & How" | Hagerman Technology Clarinet Preamplifier There was a time not long ago when audio kits were poor cousins to their factory-assembled counterparts in just about every way. While kits have been around for a very long time, it is only in the past few years that they have really come into their own. Today it is quite possible to build a top-flight audio system, from source to speakers, exclusively from kits. Whether your interest is in solid-state or vacuum-tube amplification, digital or analog sources, single-driver or line-array speakers, there is a kit for just about every conceivable audio need. There are a number of questions we hope to answer with this column. You might be wondering what kind of pedigree kits have today -- whether they're devised in the garage or designed by engineers from well-known firms. You will certainly want to know just how easy -- or difficult -- it is to assemble an audio kit, and once it's built and working, you'll be curious as to how it compares to another. There is a dearth of comparative reviews between competing audio kits, and we aim to address that here in due time. You need not fear that this column will turn into a technical treatise on electronics design. I'm not an engineer, and I couldn't write like one if I tried. What I will do is give you the technical information you need in plain English. However, the focus of this column will always be on how kits are built and how the final products sound. So if the idea of DIY audio causes you equal measures of excitement and anxiety, this column is for you. If you're a kit builder who has wondered how Company A's amp kit compares to Company B's, we aim to give you the answer. And if you think audio kits can't possibly sound as good as "the real thing," we just may burst your bubble. About me Five years ago I couldn't tell a capacitor from an inductor. I thought a resistor was someone who played hard to get. I'm a completely self-taught audio hobbyist who has built a couple dozen amps, preamps, phono stages, DACs, and signal converters, not to mention more cables than I’ll ever need. Like some of you, I have soldering-iron scars, and I’ve made more than a couple of dumb 500-volt mistakes. With this last point in mind, please exercise the utmost caution when building an audio kit or working with high heat or high voltage. Pay attention, take it slow and do it right. Your reward will be self-satisfaction and, hopefully, great sound. Hagerman Technology Clarinet preamplifier Hagerman Technology is based in Hawaii and offers a plethora of kits that fill some interesting niches. Jim Hagerman was among the first kit sellers to offer a low-cost path to high-quality computer audio -- via the HagUSB -- and even has a tube tester in his stable of products. As finished products, Hagermans's Chime DAC and Cornet phono stage have been very well received by audio reviewers and consumers alike. Hagerman’s Clarinet tube line stage is the subject of this inaugural column. According to the Hagerman website, "The Clarinet vacuum tube line stage employs a very musical SRPP topology, which provides both high linearity and low output impedance. Construction is solid and sonics are superb, easily competing with units many times its cost." Like many of Hagerman’s other products, the Clarinet is offered as both a finished product (for $899) and a "half-kit" (for $89). For ten times less money, the half-kit customer gets a circuit board and an instruction booklet/parts list, not to mention the intellectual fruit of Jim Hagerman’s labor. Parts are available from three vendors: Digikey (most electronic parts), Antique Electronic Supply (tubes, the transformer and some hardware) and Lansing Enclosures. Note that some parts are no longer available and that you may have to speak with a sales representative at Digikey in order to find an appropriate replacement. The total bill for parts and the enclosure, including shipping, came to $525.
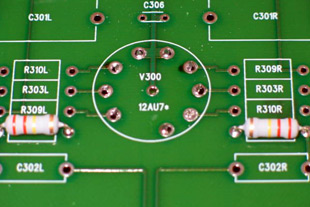
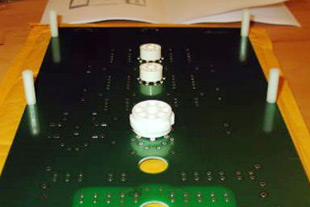
The Clarinet's manual is a combination instruction booklet and user guide. It is very spartan and provides only the most basic instructions. This doesn't pose much of a problem, as stuffing the printed circuit board (PCB) is as easy as checking the accompanying parts list for the correct item, then placing it in its marked spot on the board. You will benefit from printing a page-sized photo showing the assembled Clarinet board, as the photo in the manual is too small to use as a visual guide. The first step in assembling the Clarinet is the installation of the three tube sockets on the side of the PCB not marked for parts. It is important that the specified PCB-type tube sockets be used, as the holes on the circuit board will not accommodate the larger leads required for chassis-mount sockets. Once the sockets are in place, the instructions call for the installation of standoffs. Note that the circuit board does not sit on these but rather hangs from them once they're screwed into the chassis' top plate. Therefore, make sure you attach your standoffs on the same side of the circuit board as the tube sockets. If you go with your own chassis, you may see no reason why the tube sockets can't be placed on the parts side of the circuit board, enabling the circuit board to sit face up. Don't do it. This will reverse the pinouts. Also, when the sockets are installed per the instructions, there is a rather huge copper ground plane separating them from the preamp's discrete parts, and this may provide the tubes with some electromagnetic shielding. Installing the resistors, capacitors and transistors was a snap. In total, assembling the PCB took only 90 minutes of methodical work. It's possible to rush through in half that time, but there is a direct correlation between the speed of assembly and the likelihood of making a mistake. As that oft-reaped maxim goes, "Measure twice, cut once." Wiring the transformer to the circuit board could not have been easier. Hagerman's use of fast-on terminals makes for very neat connections, and with a little concentration it’s a simple task to get the right wires in the right spots for your local voltage. Very wisely, Hagerman put the wiring instructions on the circuit board, right where they're needed. Easily the hardest part of making the Clarinet was cutting the requisite holes in the chassis. There are three different sizes of round hole for the tubes and RCA sockets, and a large rectangular opening for the combination IEC socket/power switch. The aluminum chassis is thick enough to make the larger cuts a bit of a challenge, and I can't recommend strongly enough that you take your time when working with power tools.
The Lansing-made chassis left me somewhat underwhelmed. The aluminum panels that make up the chassis's walls are of very fine quality, with the side pieces being unexpectedly louvered for ventilation. But the top plate is thin and unimpressive, as is the less cosmetically important bottom plate. At nearly $100 for this small chassis, I would have hoped for a little more robust top plate that would match the quality of the other pieces. To make the tube openings, I decided to use drill-press-mounted hole saws. Note that the aluminum top plate will pose a bit of a challenge for these, and you will dull your blades a bit. The rectangular hole for the combo IEC socket and power switch was made by drilling holes within the rectangle’s boundaries until only jagged crescents were left around the perimeter. These were no match for my chassis nibbler (the single greatest invention known to DIY audio), and before long I had a reasonably squared-off rectangle. The IEC socket/switch looks nice and neat once in place. It’s a great feeling when you throw the power switch for the first time and don’t hear fzzzZZZT -- the hallmark of a short circuit. Thankfully the Clarinet I built was short-free and fired up without drama. A quick set of voltage checks -- made easier by marked points on the PCB -- showed that the left channel was down a few volts compared to the right, but both were within tolerance.
With the preamp stable, the next stop was the main-in connectors of my NAD C320BEE integrated amp. The NAD amp is a fine performer in its price range, but its preamp stage is a weakness that I hoped the Clarinet would address. When I powered on the amplifier, I was surprised to hear a substantial hum from my Mirage Omni 60 speakers. It quickly became clear that the hum was due to the lack of a common ground between the Clarinet and the C320BEE (with its two-prong plug). At moderate volume, the hum wasn’t an issue, and as I intended to use the NAD mostly as a break-in tool, it wasn’t much of an issue. Later, with my fully grounded Audio Note amplifier, the system was completely hum-free and dead quiet. Will Rogers never met a man he didn’t like, and the Clarinet seems equally at ease with all manner of 12AU7 tubes. From RCA clear-tops to Sylvania gray plates, from 5963s to 6189s, the Clarinet liked them all. I was taken in by this preamp’s drive and punch. Even without a lot of break-in time, the Clarinet showed that it’s adept at retrieving a level of detail that, to my ears, is more common with solid-state designs. The midrange was squarely in tube territory, though, with both male and female vocals being lively and soulful without sounding forward. The treble was slightly subdued, but not to an extent that it detracted from the overall soundscape. The first preamplifier kit I built was the original Bottlehead Foreplay. I remember finding that well-received preamp to be moderately tricky to build and difficult as heck to keep quiet and free of hum. The Clarinet does not suffer from these issues, and it is not at all fussy when it comes to tube selection, unlike that earlier-generation Bottlehead, which only behaved well with Mullards in its sockets. But like the Bottlehead at its best, the Hagerman Clarinet is a highly engaging preamplifier that will inject some tube magic into a dry all-solid-state system, or bring superior control and verve to a laid-back all tube system. That it’s easy to build and operate are added bonuses that should put the Clarinet on any DIYer's short list. ...Colin Smith
|
|||||||||
|
|||||||||
| All Contents Copyright © 2007 SoundStage! All Rights Reserved |