![[SoundStage!]](../sslogo3.gif) Fringe with Greg Smith Fringe with Greg SmithBack Issue Article |
| December 1998 In-Wall Audio, Video, Data and Phone Wiring A common consideration for many trying to assemble complicated audio setups is the classic "spouse acceptance factor." To many audiophiles, how much the person one lives with will appreciate a new purchase or construction project is a factor dismissed only at considerable risk. I'm lucky myself, since as a single guy sharing space with another single guy I'm not very constrained. In fact, my roommate is a fellow computer geek and audiophile (albeit less neurotic than myself in regards to the latter). Recently he bought a new place we moved into, and his new freedom as a homeowner allowed a rather complicated project. Our floor came wired with the standard amenities of power, phone, and cable TV. Not nearly stuff for us. He decided it was worth the trouble to open all the walls up and install extra connections for distributing audio, video, data, phones, you name it. While not a project to be taken lightly, with proper planning and care it's possible to handle such a home upgrade yourself. That is, if you've got a whole lot of time on your hands, don't mind destroying some portion of your living space for a while, and are willing to work very hard for quite some time. But even those who'd prefer to hire a person or company to install such amenities will benefit from knowing some of the details to the work.
Phase 1: The Research
More complicated was what to do about video. The standard cable TV wire deployed over the last decade is called RG-59. It's cheap, plentiful, and not especially useful nowadays. To support high quality video, be it cable TV or DSS, you need the higher bandwidth RG-6 grade of coaxial wire. If you really want to be future proof in the long term, you might consider even better video cable, but right now RG-6 is in the sweet spot where it's good enough for common current and near future use while still being inexpensive.
Note that the truly future-proof home will dispense with many of these wires in favor of some sort of fiber-optic infrastructure. At the moment fiber is a bit too expensive to deploy and difficult to terminate for the scale of project we were considering. If you project very high demands for your current or future video or data use, and you absolutely can't afford to tear a system installed today up in the future, you should be considering fiber. But it's going to cost you, and you're almost certainly going to need a professional's help. Phase 2: The Planning After selecting the type of signals you want to distribute, the next step is to figure out where they are going from and to. It's usually most straightforward to select a central location that serves as a wiring closet. All your cable then runs from the wall plates to one place, where you can connect them together as needed. This gives the most flexibility. Note that if you just want to get a number of speakers in one room, a tying them all back to the wire closet might not be necessary. You could instead run those cables to the likely place where the matching amplifier will be located. One aspect I'm not going into here is the selection of distribution hardware. For example, all your networking equipment needs to get plugged into some sort of Ethernet hub in the wiring closet. Even if you're running cable certified for 100BT, you can still use a regular old 10BT hub to start with. Phone equipment needs some sort of patch panel that interfaces with the phone company wiring and allows you to select which phone lines are available at which in-wall plug. Video switching gear could be an article or two all on its own. For example, you can take video from one part of the house, encode it into a channel, and tune that in somewhere else while still retaining the other programming. The possibilities are endless, and you'll need to spend some time figuring out what capabilities you want to enable before you start. In our case, we wanted the ability to handle several video sources around the main TV in the living room, which meant a whole bunch of RG-6 cables to that area. While I was drilling a hole in the ceiling for something else, I ran some RG-6 into the wiring closet to later connect a DSS dish located on the roof. Also, a short run of cable goes specifically between the main TV area and the kitchen, which allows a countertop TV to display whatever is on the big screen. Once you've got the capabilities and wiring closet outlined, make sure you note every place you want some number of in-wall jacks installed. With that schematic in hand, you can then figure out how much of each different type of wire to buy and what wall plates you'll need. My roommate made a big spreadsheet that tallied all this up, along with estimating the prices involved. Phase 3: The Purchasing
Since there was already a big order of stuff from HAS coming, we decided to just order the other cabling from them as well. While I'd have preferred to get the top-quality stuff from Belden instead, this project was getting difficult enough already to drag even more suppliers in. The Cat 5 cable we received cost $109.95 per 1000 feet, and it checks out fine even running at 100Mbps. I haven't tested the RG6 cable too carefully yet, so the jury is still out as to whether the $129.95 spool of 1000 feet was a bargain or a bad decision. I'm not too worried, because the only time I ever get that picky over video quality is when watching DVDs, and that cable isn't inside the walls, making for an easy upgrade.
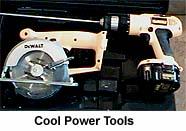
Phase 4: The Installation Now comes the fun part. Move all your precious possessions to another room, because drywall dust is not healthy. The first step is to mark the spots where you'll be cutting around. Obviously, give a wide berth to existing outlets and wiring. This isn't always possible to know in advance; my roommate watched them build this room, so he was sure where everything was installed at, but you might hit something. Again, if you're not sure you know what you're doing in that regard, you should get some professional help. Out comes the little circular saw, and around the room you go. When you're done you should have a clear path all the way from every potential plate location to every other and into the wiring closet. The next step is to drill holes thorough studs as necessary to get a path along the whole route. Depending on how fastidious you are, you can try to keep the different types of signal separated from each other. It's a particularly good idea to keep everything as far as possible from the power lines, especially the sensitive data lines. Cross any power cable at a right angle if it's unavoidable (and it usually is). Cable pulling is its own adventure that it's difficult to explain; you just need to practice some to figure out how to make things go smoothly. One thing that might help you is lining the holes you cut with some tape, so there isn't as much drag on the cable as it goes through them. Make sure to leave plenty of extra wire at both ends, because it's always easier to cut off excess than pull anew. One area I'm not going to give much advice on is
the selection of wall boxes. To get a solid spot to route your wire through and attach
plates to, you need to get some metal boxes that mount on whatever studs support the wall
in that area. The choice of appropriate boxes is a complicated matrix of what you're going
to put in that box, what faceplates are being installed, and how the box is going to be
attached to the stud. I never did figure out exactly what was involved myself, and my
roommate made endless trips to Home Depot buying samples of various models before he got
ones that fit properly. Terminating Cat 5 in a manner that it will work at 100Mbps is its own adventure. The Leviton female RJ-45 jacks make that end of the connection fairly easy. You strip the outer insulation off the Cat 5, cut away the fuzzy filler you'll find, and separate the eight wires out. Some of the small wires inside have solid colored jackets, while others have an alternating solid/white pattern. If you look at the jack you're going to attach, it has two sets of color codes that match these wires. Pick one and standardize on it; I used the "B" configuration because that matches how I originally learned to terminate this style of Ethernet cable. To get the cable to fit just right, start by only concerning yourself with the two wires that go closest to the front of the jack (for the B configuration, that's the orange and brown/white ones). When you align these two, the spot where you stripped the insulation off should just barely be inside the end of the RJ-45 connector. Push the top two wires through, use the punch-down tool. The cutting end goes on the outside edge to trim any excess. After the snap of the tool, you should have a solid connection for two wires. Push the other six through their slots, punch all of them, and you're done with that connector. At the other end, if you want to use a regular male RJ-45 plug, it's more of a pain. You start the same way, stripping off the outside jacket. Next you need to untwist all eight wires and lay them out in exactly the right order (using other layouts may result in the cable not working at higher speeds like 100Mbps). The Leviton jack gives a clue to what you should do at the other end. The color code for the configuration you picked will have a corresponding set of numbers that identify what order the wire at the other end needs to go. After you get it lined up that way, smooth the whole thing out and snip all the wires a hair so they are even. Normally, pulling the pairs apart ends up making some a bit longer than others, and that will prevent you from pushing the wires into the plug correctly. Take your RJ-45 connector and turn it so the plastic pin that snap into place is facing down. Looking at the plug this way, pin #1 is on your left. Carefully insert the wires into the connector, making sure each of the eight wires finds the plastic channel intended for it. The wire needs to travel all the way to the top of the jack for the connection to work. You can check this by looking at the side of the connector. Also, some of the insulation material should be tucked under the middle part of the connector, where it gets clamped down on. This provides strain relief for the whole cable. If the insulation is all outside the connector, cut some of the wires off until it all fits just right. After this whole tenuous process is done, you put the connector in your crimp tool and press down hard. This whole process takes quite a while to get right if you're trying to learn by reading instructions. (it takes even longer to figure out on your own, which is how I started) If you can find a local computer maven familiar with making Cat 5 cables to shows you the procedure, the learning curve is much less steep. But in any case, you should practice building some regular cables for a while first (like you'd use to connect your computer to a hub) and not try to terminate the in-wall stuff until you're fairly good at that. You can easily chew up all your spare wire sticking out of the wall learning how to terminate these little things, so on the job training isn't really a good idea. After everything is terminated and tested, it's time to close the walls. It's amazing how heavy two 4x8' sheets of drywall feel when you have to carry them up five flights of stairs. If your walls were made of something other than drywall, I hope you know what to do at this point, because I don't. In our case, cutting out strips that matched the height of the original hole was the first step. The really fun part is knocking out the small sections for all the outlets and boxes you installed. Mark the spots where the studs are, press the drywall in place, and use some drywall screws to hold it all in place. I've used drywall screws for many years before, but this was the first time I ever saw them used for their original purpose. Now, if I can see duct tape being used on ducts my life will really be complete. The next part is the most fun out of anything involved in this project. Fill in the gaps and screw holes with drywall paste, wait for it to dry, and start sanding everything down. Make sure you use a breathing mask for this one so you don't choke on the dust which will soon cover every square inch of the surrounding area. When the seams are smooth (which is more important then them being flat on a global scale), you can wipe the dust off the walls, prime, and paint. When the paint's all dry, screw on all the faceplates and you're ready to play with your new, easier to use home. Phase 5: Miller Time
It took a month or so to mull over the possibilities for our project, followed by a couple of weeks to get all the equipment delivered and sorted out. Once my roommate cut the walls open, which took a few hours per room, we both worked on running wire, terminating, and testing during any spare time we had over the course of a few weekends. Cutting the drywall to size and closing everything back up took about a weekend to get started, with progress continuing over the course of the following week. Given that several steps of that process require waiting a while for things to dry, it's tough to speed it up. After everything was finished, both of us worked for a full weekend to clean up after the construction. I predict we'll still be mopping drywall dust for months yet. And all that was just for the living room and kitchen. Obviously, our later work upgrading the bedroom and bathroom sections will happen much quicker because of the experience we've gotten. If this sounds like a lot of work, that's because it is. But the end result is a home that's more functional, more flexible, and just plain more fun to live in. .....GS (gsmith@westnet.com) |
|
| All Contents Copyright © 1998 SoundStage! All Rights Reserved |
 The usual disclaimer before we
start. The type of work I'll be outlining here is dangerous on several fronts. You could
easily kill yourself by not turning off the proper circuit breakers and hitting a live
power cable. You can cause substantial damage to your home. On a more abstract level, you
can put yourself in legal peril by not having the proper permits, inspections, insurance,
etc. for the work you perform. If you have any doubts about your competency, you should
consider this article as merely food for thought to mull over before hiring a
professional. I'm trying to pass along ideas here, not go into detail about how to safely
perform these operations. Start your power saw at your own risk, and don't blame me if
you're missing a couple of fingers before you're done.
The usual disclaimer before we
start. The type of work I'll be outlining here is dangerous on several fronts. You could
easily kill yourself by not turning off the proper circuit breakers and hitting a live
power cable. You can cause substantial damage to your home. On a more abstract level, you
can put yourself in legal peril by not having the proper permits, inspections, insurance,
etc. for the work you perform. If you have any doubts about your competency, you should
consider this article as merely food for thought to mull over before hiring a
professional. I'm trying to pass along ideas here, not go into detail about how to safely
perform these operations. Start your power saw at your own risk, and don't blame me if
you're missing a couple of fingers before you're done. 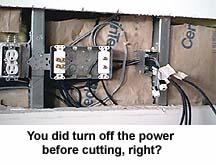 Way before you start cutting
the walls, it's helpful to know what exactly your goals are. We had quite a few different
types of electrons to distribute. The most obvious was audio. The surround system in the
living room had a huge run of speaker cable going to the back, which doesn't look very
good. Since it's both difficult and expensive to visit your local high-end dealer for
really high quality speaker cable when you need a 30 foot run for each channel, I'd
settled for cheap stuff from Radio Shack just to get everything wired up one day with a
minimum of hassle. This is a pretty straightforward problem: if you put speaker wire in
the walls and terminate it at both ends, you're done. To really expand your possibilities,
you might also consider some sort of in-wall interconnect with an RCA jack at both ends.
This lets you use powered speakers in the future. The really serious might even consider
running digital cable, i.e. 75 ohm coaxial stuff. I won't totally dismiss the possibility
that five years from now I'll be using digital speakers in the rear of my home theater,
but it didn't seem a big priority to install that sort of thing quite yet.
Way before you start cutting
the walls, it's helpful to know what exactly your goals are. We had quite a few different
types of electrons to distribute. The most obvious was audio. The surround system in the
living room had a huge run of speaker cable going to the back, which doesn't look very
good. Since it's both difficult and expensive to visit your local high-end dealer for
really high quality speaker cable when you need a 30 foot run for each channel, I'd
settled for cheap stuff from Radio Shack just to get everything wired up one day with a
minimum of hassle. This is a pretty straightforward problem: if you put speaker wire in
the walls and terminate it at both ends, you're done. To really expand your possibilities,
you might also consider some sort of in-wall interconnect with an RCA jack at both ends.
This lets you use powered speakers in the future. The really serious might even consider
running digital cable, i.e. 75 ohm coaxial stuff. I won't totally dismiss the possibility
that five years from now I'll be using digital speakers in the rear of my home theater,
but it didn't seem a big priority to install that sort of thing quite yet. 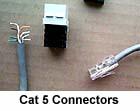 Data and phone connections are
the final piece. Right now, Ethernet is what's used by most people to network their
computers. Normally that comes in two forms. 10 Base-T (10BT) networks run at 10
Megabits/second (Mbps) using at least four wires (two pair) of Category 3 or better
twisted-pair cabling. "Category" in this case is a cable grade used by the
industry, where higher numbers are better. Also note that it's possible to run Ethernet
over coaxial cable, but that is more difficult to maintain and as a result is rarely used
nowadays. It's extremely cheap and easy to build a 10BT network, but it's not an
especially good idea. If you're going to trouble of wiring something that's difficult to
upgrade later, i.e. in-wall cable, you should do better than that. 100Base-T (100BT)
networks work at 100Mbps using eight wires (four pair) of Category 5 or better cabling.
"Cat 5," as it's commonly called, is all the data wire a normal home will ever
need. Happily, it can also serve as excellent phone cabling. Normal phone wiring requires
a single pair of wire per line. Your run of the mill phone cable includes two pair,
supporting two phone lines, and is terminated with a modular plug called the RJ-11. 10BT
and 100BT connections use a RJ-45 connector. The RJ-45 female jack is designed so that you
can plug a regular RJ-11 plug into it, so if you wire everything using Cat 5 and RJ-45's
the same cable can support both phones and Ethernet as long as you put your wiring closet
together correctly.
Data and phone connections are
the final piece. Right now, Ethernet is what's used by most people to network their
computers. Normally that comes in two forms. 10 Base-T (10BT) networks run at 10
Megabits/second (Mbps) using at least four wires (two pair) of Category 3 or better
twisted-pair cabling. "Category" in this case is a cable grade used by the
industry, where higher numbers are better. Also note that it's possible to run Ethernet
over coaxial cable, but that is more difficult to maintain and as a result is rarely used
nowadays. It's extremely cheap and easy to build a 10BT network, but it's not an
especially good idea. If you're going to trouble of wiring something that's difficult to
upgrade later, i.e. in-wall cable, you should do better than that. 100Base-T (100BT)
networks work at 100Mbps using eight wires (four pair) of Category 5 or better cabling.
"Cat 5," as it's commonly called, is all the data wire a normal home will ever
need. Happily, it can also serve as excellent phone cabling. Normal phone wiring requires
a single pair of wire per line. Your run of the mill phone cable includes two pair,
supporting two phone lines, and is terminated with a modular plug called the RJ-11. 10BT
and 100BT connections use a RJ-45 connector. The RJ-45 female jack is designed so that you
can plug a regular RJ-11 plug into it, so if you wire everything using Cat 5 and RJ-45's
the same cable can support both phones and Ethernet as long as you put your wiring closet
together correctly. 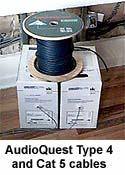 As a reviewer who knows better,
I couldn't bear the thought of using any old speaker cable in the walls. The sonic
differences involved are especially important when you have the kind of really long runs
that go with this sort of wiring. Lately I've been recommending AudioQuest Type 4 cable as
a well balanced product that is reasonably priced. Type 4 normally runs $2.50/ft retail,
which seemed fairly expensive but feasible for the lengths we needed in our place. You
might get it cheaper in large quantities, like the 328 foot (100m) spool I bought. In
addition to this project, I've used some of the leftovers to make very inexpensive speaker
cable. Add some $5 spade connectors from Radio Shack, and you can get a nice run for less
than half of retail. You definitely lose something compared with what a factory terminated
set of that cable would cost, but considering how low the price is that's not too hard to
take. Type 4 is not officially rated for in-wall use. The company tells me that when the
jacket is burned, some chemicals pollute the air that are not allowed by normal
installation regulations. Even more problematic is that the filler material used will
light very easily, allowing fire to spread along the length of the cable quickly. This
means a building wired with the Type 4 will not pass a formal inspection. For a small
scale project you're sneaking in under the nose of the authorities, this isn't an issue,
but it's something to be concerned about if a real inspection might be necessary.
AudioQuest makes cable designed specifically for in-wall use, but the two models they
described to me were a Goldilocks style match. One was less expensive, but the sound
quality suffered. One was considerably more expensive, but supposedly better. Since Type 4
is sitting right in the sweet spot of performance per dollar, I decided to just buy a
spool of that and be done. I think it's a far better move to use a reasonable gauge solid
core design like Type 4 than the big, fat stranded junk normally recommended for the home
installation market.
As a reviewer who knows better,
I couldn't bear the thought of using any old speaker cable in the walls. The sonic
differences involved are especially important when you have the kind of really long runs
that go with this sort of wiring. Lately I've been recommending AudioQuest Type 4 cable as
a well balanced product that is reasonably priced. Type 4 normally runs $2.50/ft retail,
which seemed fairly expensive but feasible for the lengths we needed in our place. You
might get it cheaper in large quantities, like the 328 foot (100m) spool I bought. In
addition to this project, I've used some of the leftovers to make very inexpensive speaker
cable. Add some $5 spade connectors from Radio Shack, and you can get a nice run for less
than half of retail. You definitely lose something compared with what a factory terminated
set of that cable would cost, but considering how low the price is that's not too hard to
take. Type 4 is not officially rated for in-wall use. The company tells me that when the
jacket is burned, some chemicals pollute the air that are not allowed by normal
installation regulations. Even more problematic is that the filler material used will
light very easily, allowing fire to spread along the length of the cable quickly. This
means a building wired with the Type 4 will not pass a formal inspection. For a small
scale project you're sneaking in under the nose of the authorities, this isn't an issue,
but it's something to be concerned about if a real inspection might be necessary.
AudioQuest makes cable designed specifically for in-wall use, but the two models they
described to me were a Goldilocks style match. One was less expensive, but the sound
quality suffered. One was considerably more expensive, but supposedly better. Since Type 4
is sitting right in the sweet spot of performance per dollar, I decided to just buy a
spool of that and be done. I think it's a far better move to use a reasonable gauge solid
core design like Type 4 than the big, fat stranded junk normally recommended for the home
installation market. 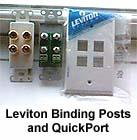 Much of the research for this
project happened on the Internet, and the distributors who sell products aimed at the home
automation market provide some very helpful literature. The best organized place we found
was Home Automation Systems, at
Much of the research for this
project happened on the Internet, and the distributors who sell products aimed at the home
automation market provide some very helpful literature. The best organized place we found
was Home Automation Systems, at 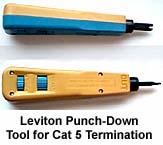 You should also be sure to
order the right tools to terminate everything when you're ordering the cable and outlets.
The AudioQuest Type 4 strips easily with any old wire stripper. In order to terminate the
Cat 5 onto the Leviton jacks, you need to buy the corresponding punch-down tool ($74.95).
For connecting the other end of the Cat 5, you may want regular modular RJ-45 plugs
($5.95/20). You'll need a RJ45 crimping tool for that. I like the IDEAL Telemaster, which
I bought a while ago but don't have a source handy for at the moment. The $29.95 model HAS
sells will work, but it doesn't have as good of a feel as the more expensive tools I use.
Video termination requires F connectors, which you can get in twist-on and crimp-on
variants. The crimping models should give a better long-term result for in-wall usage.
That requires yet another crimping tool, which runs $14.95. While it's possible to strip
the RG6 wire with a knife or such, getting a tool for that makes the video termination go
smoother. HAS has one for $18.95, and Radio Shack carries two models as well that work
fairly well.
You should also be sure to
order the right tools to terminate everything when you're ordering the cable and outlets.
The AudioQuest Type 4 strips easily with any old wire stripper. In order to terminate the
Cat 5 onto the Leviton jacks, you need to buy the corresponding punch-down tool ($74.95).
For connecting the other end of the Cat 5, you may want regular modular RJ-45 plugs
($5.95/20). You'll need a RJ45 crimping tool for that. I like the IDEAL Telemaster, which
I bought a while ago but don't have a source handy for at the moment. The $29.95 model HAS
sells will work, but it doesn't have as good of a feel as the more expensive tools I use.
Video termination requires F connectors, which you can get in twist-on and crimp-on
variants. The crimping models should give a better long-term result for in-wall usage.
That requires yet another crimping tool, which runs $14.95. While it's possible to strip
the RG6 wire with a knife or such, getting a tool for that makes the video termination go
smoother. HAS has one for $18.95, and Radio Shack carries two models as well that work
fairly well. 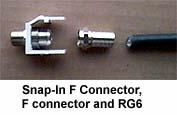 Once the cables are all run, you should
terminate them before closing the walls up simply as a wise form of paranoia. The
AudioQuest Type 4 strips easily and fits well into the Leviton binding post screw-down
terminal. I'd be concerned using really thick wire with those posts because there's not
all that much room to wedge your copper in the hole provided. Terminating the video RG-6
is just a matter of practicing the stripping and crimping operations until you get a
secure connection.
Once the cables are all run, you should
terminate them before closing the walls up simply as a wise form of paranoia. The
AudioQuest Type 4 strips easily and fits well into the Leviton binding post screw-down
terminal. I'd be concerned using really thick wire with those posts because there's not
all that much room to wedge your copper in the hole provided. Terminating the video RG-6
is just a matter of practicing the stripping and crimping operations until you get a
secure connection.  As I mentioned before, properly
utilizing in-wall cable requires a variety of gadgets like network hubs, video switching,
etc. Now is where you get to learn what capabilities you can utilize. In my place, the big
immediate win was distributing the T1 connection I have for Internet access to everywhere.
As both of us have multiple computers, including a portable each, being able to plug in
and hit the 'net from anywhere is quite handy. The DSS dish and phone applications are
still in process at the moment. I'm very happy to have good speaker cable for the rear
part of the home theater at last. Even with the extra binding posts in the signal path,
the Type 4 makes for far better sound quality than the cheapo cable I had been running
along the floor. And it unquestionably looks neater.
As I mentioned before, properly
utilizing in-wall cable requires a variety of gadgets like network hubs, video switching,
etc. Now is where you get to learn what capabilities you can utilize. In my place, the big
immediate win was distributing the T1 connection I have for Internet access to everywhere.
As both of us have multiple computers, including a portable each, being able to plug in
and hit the 'net from anywhere is quite handy. The DSS dish and phone applications are
still in process at the moment. I'm very happy to have good speaker cable for the rear
part of the home theater at last. Even with the extra binding posts in the signal path,
the Type 4 makes for far better sound quality than the cheapo cable I had been running
along the floor. And it unquestionably looks neater.