
John Upton
October 1996
Need a rock-solid rack for your audio gear but don’t want to pay a small fortune for a commercially available unit? Have a few tools and a few hours to kill? If so, you may want to ‘roll your own’ custom rack system.
 The Rack and Roll
project is an 18’’ tall, infinitely adjustable audio
rack featuring four (4) 24’’-wide x 15
3/4’’-deep x 3/4’’-thick shelves bound
together with steel nuts and 3/4’’ diameter threaded
metal rods. Requiring only the most rudimentary woodworking
skills and using tools found in most everyone’s garage or
basement, this rack is easy to build, inexpensive, and will
really let your components strut their stuff. Interested?
Here’s how it’s done....
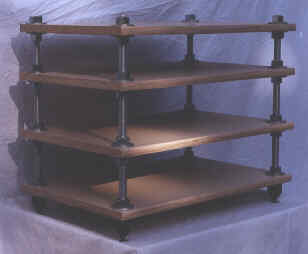
The Rack and Roll
project is an 18’’ tall, infinitely adjustable audio
rack featuring four (4) 24’’-wide x 15
3/4’’-deep x 3/4’’-thick shelves bound
together with steel nuts and 3/4’’ diameter threaded
metal rods. Requiring only the most rudimentary woodworking
skills and using tools found in most everyone’s garage or
basement, this rack is easy to build, inexpensive, and will
really let your components strut their stuff. Interested?
Here’s how it’s done....
PARTS & TOOLS
Here’s a list of all the basic parts and tools you will need to complete the Rack and Roll project. I purchased all of the parts at my local Home Depot, but any decent hardware store should have them in stock.
| Parts |
Quantity | Price per |
Total Cost |
| 15 3/4’’ x 97’’ x 3/4’’ particle board with simulated woodgrain vinyl covering | 1 | $7.72 | $7.72 |
| 36’’ threaded rod (3/4’’ diameter) | 2 | $6.25 | $12.50 |
| 3/4’’ steel nuts | 32 | $0.33 | $10.56 |
| 3/4’’ steel washers | 32 | $0.21 | $6.72 |
| 3/4’’ rubber caps | 4 | $0.49 | $1.96 |
| Total: | $39.46 | ||
TOOLS NEEDED
CONSTRUCTION
Step 1: Cut Wood and Threaded Rods
Using your circular saw, carefully cut four (4) 24’’ wide shelves out of your 97’’ board. Try cutting your shelves as equal in size as possible as this will make measuring the holes for Step 2 much easier. If you intend to paint, laminate, coat, or otherwise cosmetically enhance the appearance of your shelves, now is the time to do it.
An 18’’ tall audio rack calls for four (4) 18’’ threaded rods. Unfortunately, it seems that threaded rods are only commonly sold in one foot, two foot, or three foot lengths. You will need to make your own 18’’ threaded rods by cutting your two 36’’ threaded rods in half with a hacksaw.
Step 2: Drill Holes in Shelves
Using your 3/4’’ drill bit, drill four (4) holes through each of your shelves, one in each corner of the each shelf. Center your holes approximately 1 1/4’’ from each edge of the shelf. For this step, it is vitally important to drill these holes as straight as possible, so use a drill press if you have access to one. Crooked holes will make it more difficult feed the treaded rod through the shelves.
Step 3: Assemble Rack
Screw a nut onto one end of each of your four (4) threaded rods. Turn them over, place a washer onto each treaded rod, and feed them down so they rest on top of the steel nuts. Next, guide the threaded rods through the holes you drilled in what will be your top shelf until that shelf rests on top of the washers. At this point, you will know your degree of success in drilling straight holes. If the threaded rods are pointing in a variety of interesting directions, you will need to file out these holes until the rods can be fed through the shelf perpendicularly. Once this is done, guide another set of washers down the threaded rods and follow them with another set of nuts. DO NOT tighten them to the shelf at this point, however, as you may need some room to maneuver later. Your first shelf is now more or less in place.
For additional shelves, repeat the above process, using the position of the supporting nuts and washers to establish the distance between shelves. The needs of your individual components will dictate the amount of space needed. Remember not to tighten the nuts completely as you will need room for adjustments during the leveling phase.
Step 4: Level Rack
Once you have added all the shelves to your Rack and Roll, place the rack upright in the location where it is to be kept and begin the leveling process. My suggestion here is that you establish one corner as the reference height and adjust all the other corners to it by screwing and unscrewing the nuts, adjusting the position of the shelf in the process. When the shelf is perfectly level, secure it in place by firmly tightening the nuts. Repeat this process on the remaining shelves until the entire rack has been leveled. When this is done, cover the nuts acting as the “feet” of the rack with the rubber caps, place your components on the rack, and enjoy. Your Rack and Roll project is complete.
COMMENTS AND UPGRADES
When I embarked upon the Rack and Roll project, I was primarily interested in addressing a rack size problem in my listening room and gave little thought to the potential impact on the sound of my system. I was shocked, therefore, by the level of sonic achievement this rack was able to extract from my admittedly modest (Rotel, NAD, Rega, Marantz) components.
Bass performance was perhaps the most noticeable enhancement. I began to hear notes coming from my speakers hitherto completely unknown to my system. Not only did the bass seem to be plunging to substantial new depths, clarity improved from top to bottom. In addition, rock and blues recordings seemed to have a greater sense of rhythm and timing than ever before- it was almost as if the addition of the rack triggered an invisible “boogie switch” on my preamp. Needless to say, the cheesy dime store audio/video rack I had been using has been designated for assignment and will likely be optioned to my next-door-neighbor’s monthly yard sale.
Intrigued with the possibilities of this rack, I decided to explore ways to further optimize its performance. For the princely sum of $50.00, I purchased a set of 4 (four) “Ultra Systems Bottom Cones” from my local high-end shop (Hi, Mel). These heavy steel cones screw onto the bottom of the threaded rods, replacing the rubber capped bottom nuts, and add a further level of refinement and improvement in the sound of components placed on the rack. Though costly, I consider these cones to be a worthwhile upgrade.
As to other tweaks, you may wish to further damp the rack by placing large neoprene washers between the steel washers and the wooden shelves. These washers are not easy to find in bulk, however, and will set you back approximately $0.99 each. You might also consider experimenting with different kinds of wood for the shelves. I’m sure there must be better stuff out there than particle board.
Those of you looking for a ‘bottom line’ are probably want to know whether the Rack and Roll project will yield results similar to or better than commercially available racks. Unfortunately, having never owned a rack manufactured by one of the big boys (Roomtunes, Target, Standesign, etc.), I do not feel qualified to comment. I can say, however, that performance-wise, this rack will walk all over anything anywhere near its price range and likely rivals racks costing hundreds of dollars.
For the budget-minded audiophile looking to improve his system, a rock- solid equipment stand will work wonders in eliciting the maximum capability out of his components for a very modest investment. The Rack and Roll project is easy to construct, easy to customize, and can be upgraded as your needs, funds, and know-how may allow. Try it…you will be surprised.
Finally, on a personal note, I’d be very interested in any suggestions for further tweaks, improvements, or refinements to the Rack and Roll Project. I can be reached for suggestions, comments, or complaints via email. Enjoy!
...John Upton
jmu@soundstage.com
Copyright 1996 by John Upton
Reproduction without Permission is Prohibited