|
September 2000 New Life for S-Video Connections Through DIYby Doug Blackburn Standard S-Video connections take a back seat, quality-wise, to the newer three-wire component video setup. Most consumer component video connections have RCA jacks on both ends. S-Video connections employ particularly annoying mini-DIN connectors. The female end of these connectors, found on DVD players, some VCRs, and many video monitors, are nothing to write home about with respect to quality. You can fix that. In fact, you can fix it so well that your modified S-Video connection will outperform component video using RCA jacks. The only connection that will remain slightly superior to your modified S-Video is component connections using BNC connectors on both ends. BNCs are better for high-frequency video signals (and digital-audio signals) than the RCA connectors used in most consumer products. The difference is significant enough to be visible in a video system of any reasonable quality. The S-Video fix involves replacing your S-Video connectors with BNC connectors. You will be left with two separate wires using two BNC connector sets rather than using the single S-Video connector to make both connections (with what appears to be a single cable).
The first step is to procure two female BNC connectors for each S-Video connector you want to replace. If you want to go from a DVD player to a video monitor, you will need a total of four female BNCs. You will need a pair of video cables with male BNCs on each end for each connection you want to make. That’s four male BNCs per connection. BNCs are not particularly expensive, at least not compared with high-end audio connectors from specialty companies. You have three choices for BNC-equipped video cables:
Remove the S-Video connector from each component you will be converting to BNCs. Most often the S-Video connector will have stamped steel leads soldered to a PCB. De-solder all four of those connections completely and remove any retaining hardware that is holding the S-Video connector. You will need two holes in the chassis to fit the replacement BNC connectors. The hole for the S-Video connector may be suitable for one BNC connector so you may only need to drill one more hole. If the existing S-Video hole is inappropriate, you will need two new holes. Check out the available space on the component before committing to this change. If there is a serious space shortage, you could solder coax directly to the PCB, add a strain relief and do away with the BNCs altogether. You will lose some flexibility and convenience, but you’ll lose another pair of connectors in the signal path, which is a good thing whenever possible. When the BNC connectors are installed, make new connections from the PCB to each BNC using coaxial cable. The same coax you will use for the new cables is fine. If that is too fat or too stiff, get a high quality HDTV-bandwidth-rated mini-coax to use for these connections. Locate the Luminance ground and Luminance signal connection points on the PCB. Connect the coax shield to ground and the Luminance signal to the center conductor. Repeat the same connections for the Chrominance coax. On the other end of these short coax cables, connect the signal to the center pin of the BNC and the ground to the outer shell of the BNC. You may want to color code one of the connections, Luminance or chrominance, on the component ends so you don’t cross connections at some future time. If you make the wrong connections at some point in the future, nothing will break, but your picture will be hosed. Getting rid of the lame chassis-mount S-Video connector and using BNCs for signal transmission will give you excellent video results. The results will be so good, that your anxiety over not having component video connections will disappear. In fact, if you were contemplating a change that would allow you to use component connections with RCA jacks, this two-wire BNC connection setup will look better than component with RCAs. The video image quality will have improved in a snap, a combination of edge detail, color differentiation and purity that will give images a more dimensional appearance. In addition, visible noise will be reduced, especially if low-loss, well-shielded, high-bandwidth cables are used. When you are done with this modification, you will officially not be using S-Video any longer since you have jettisoned the S-Video connector. If you decide to buy commercial video cables from a supplier/dealer instead of making them yourself, things will be a lot less confusing if you avoid referring to "S-Video." What you will want is a HDTV-capable coax with male BNCs on both ends. Just remember to order two of these for each connection you want to make. As they say at Disney Studios… Buena Vista! GO TO
|
||
| Copyright
© 2000 SoundStage! All Rights Reserved |
![[SOUNDSTAGE!]](../../titles/sslogo3.gif) |
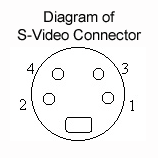 Here’s the pin assignment for an S-Video connector as
it appears on a DVD player, video monitor, or other component:
Here’s the pin assignment for an S-Video connector as
it appears on a DVD player, video monitor, or other component: