![[SoundStage!]](../sslogo3.gif) Fringe with Greg Smith Fringe with Greg SmithBack Issue Article |
||||||||||||||||||||||||||||||||||||||||||||||||||||
| September 1998 Can't Stand It? Do It Yourself! I'm not by nature a "Do It Yourself" kind of guy. My encounters with power tools and other sharp objects usually result in blood flowing. Years of soldering practice have improved things to where I only burn myself half the time when I pick up an iron. I'm just not all that handy. As a result, it's usually more efficient for me to buy things than construct them myself. Just as I gladly pay someone to change the oil in my car rather than mess with that myself, most of the components that make up my audio system were purchased rather than built. But sometimes it's impossible to get exactly what you want off the shelf. I've gotten pretty good at building small shelving units and desks for oddly sized spaces I want to utilize for storage. And a year spent designing generally mediocre speakers taught me a bit about making sturdy audio enclosures. So when I found that the marketplace wasn't offering what I wanted for speaker stands, I reluctantly headed to the store and started looking for parts. I had thought my needs were pretty standard. Now that I'm dealing with home theater more, I wanted speakers stands more suited for that environment than the ones I'd been using. Generally, rear speakers tend to be smaller than the ones used in front, and often they are behind a couch or other obstacle. This calls for much higher stands than you'd want to use for regular stereo listening with speakers in front of you. I figured at least 30" high was a minimum for this application. The speakers I was using at the time included the B&W 602 and NEAR 10M, both of which are fairly hefty. To be useful across a fairly broad section of the models I might try, I estimated the stands should hold at least 50 pounds each. The target price was between $50 and $100, preferably on the low side of that range. Off I went shopping. I came back with nothing. None of the stands that were tall enough for my needs were also sturdy enough for the weight class of speakers I was interested in. Since then, manufacturers have slowly started to introduce models specifically for the surround buyer, but that did me no good at the time. I could have used one tried and true technique and stacked some cement blocks, but I wanted something a bit more visually pleasing than that. I briefly considered using the blocks with a Vandersteen-esque black sock around them, but this seemed more trouble than it was worth. I recalled reading a 1993 article in Speaker Builder on the topic of making stands with metal pipes, so I headed off to that section of the local Home Depot.
Heading up to the counter, I had to fork over $54.02 for the whole mess. The breakdown went like this:
About what I wanted to spend, and I could have shaved a few bucks off by picking the wood more carefully. After all, one 4' section of 12" wide wood is sufficient if you're willing to cut it up a bunch yourself.
Screw the flanges into the other end of the pipe and make sure everything is level. Now you're ready to put the bottom plate on. I found it easiest to outline the proposed location by writing on the wood before putting screws in. This allows you to make sure you've centered everything correctly. Eight screws later, and you've got a finished stand. If you're satisfied with this, I suspect you're not a serious audiophile. After proving the concept made a generally good stand, I went through several attempts at improving the design. Some worked, some didn't.
Before you make such a permanent connection, there's a few other ways to improve the mechanical integrity of the stand. Loctite makes a $2.46 chemical formulation designed for resisting vibration in threaded fasteners called Threadlocker. Adding some around the pipe threads before screwing them in gave a more rigid result. Note that one bottle may not be quite enough for all eight threads, so grabbing some extra is advised. I also tried Loctite Tite'N ($2.96), which is aimed at holding screws in place better. This wasn't really productive when building stands with freshly drilled screw holes that get reamed out as you drive the screw into place.
Here's a quick summary of the optional accessories I recommend, in descending order of importance:
I've got stands I'm quite happy with now, but I won't fall prey to builder's hubris and declare them world-beaters quite yet. After playing with the results of the above experiment some, there are a number of things I'd do different if aiming for higher performance stand:
If you really want to go crazy, you can start experimenting with multi-layer sandwiches of material or designs that aim for a really heavy result. But I personally find even the simplest stand described here to be quite useful for its original purpose of surround speaker support. I'd certainly lean more toward a beefier construction for front speakers, which probably don't need to be nearly as high. It's fun to build project like this yourself instead of buying them, even if you're not the a natural at wood-working. I built what I wanted at the price I was aiming for and didn't cut myself once in the process, so I call these stands a success. If you decide you like the idea of building stuff with pipes and wood, dive into our archives and check out John Upton's rack construction project. Greg Weaver's DIY rack article also has many helpful suggestions on this topic. .....GS (gsmith@westnet.com) |
||||||||||||||||||||||||||||||||||||||||||||||||||||
|
||||||||||||||||||||||||||||||||||||||||||||||||||||
| All Contents Copyright © 1998 SoundStage! All Rights Reserved |
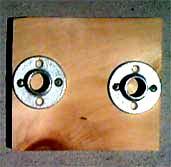 After looking at the pipes available, 3/4"
seemed the right diameter, and a 36" length was available. The pipe flanges these
screw into were fairly expensive, but the pipe does you no good by itself. Heading into
the lumberyard, I picked the first wood that seemed the right size. I figured that an
8"x8" top plate was appropriate, so I grabbed a 1"x8" length of pine
from the available stock. You can pay a bit extra and get the store to cut that into
8" sections for you, I've got a table saw for such tasks. 12" square seemed
about right for the bottom, so I grabbed a board of that width as well. After buying a
bunch of different ones and trying them out, I can tell you that the #10 x 3/4" sheet
metal screws seem to work best for holding the flanges in place. The head needs to be that
big, and wood screws I found of that length don't have enough thread on them to hold well
enough.
After looking at the pipes available, 3/4"
seemed the right diameter, and a 36" length was available. The pipe flanges these
screw into were fairly expensive, but the pipe does you no good by itself. Heading into
the lumberyard, I picked the first wood that seemed the right size. I figured that an
8"x8" top plate was appropriate, so I grabbed a 1"x8" length of pine
from the available stock. You can pay a bit extra and get the store to cut that into
8" sections for you, I've got a table saw for such tasks. 12" square seemed
about right for the bottom, so I grabbed a board of that width as well. After buying a
bunch of different ones and trying them out, I can tell you that the #10 x 3/4" sheet
metal screws seem to work best for holding the flanges in place. The head needs to be that
big, and wood screws I found of that length don't have enough thread on them to hold well
enough. 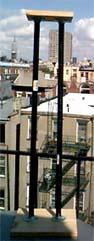 For assembly, it's easiest to start with the top
section. Attach the flanges to the edge of the top plate. If you're using a softwood like
pine, the screws will bite easily and can be drive in with a regular screwdriver. A small
pilot hole is recommend for harder woods. Screw the pipe into the flanges, taking care not
the force it once it gets difficult to turn. There's a point where the pipe wants to stop
moving forward, but enough torque will push past there. The result is busted wood if you
keep going (this is why I got extra supplies).
For assembly, it's easiest to start with the top
section. Attach the flanges to the edge of the top plate. If you're using a softwood like
pine, the screws will bite easily and can be drive in with a regular screwdriver. A small
pilot hole is recommend for harder woods. Screw the pipe into the flanges, taking care not
the force it once it gets difficult to turn. There's a point where the pipe wants to stop
moving forward, but enough torque will push past there. The result is busted wood if you
keep going (this is why I got extra supplies). 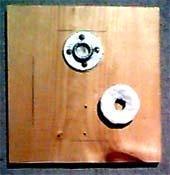 The first accessory everybody needs when
experimenting with speaker stands is Tak. John Stafford wrote a
The first accessory everybody needs when
experimenting with speaker stands is Tak. John Stafford wrote a 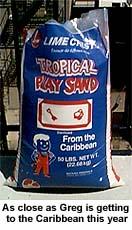 Many commercial stands are made to be filled with
sand before deployment, and that proves to be a good idea with these home-brew stands as
well. A big 50-pound bag set me back $2.96, and now I have enough sand to start a small
beach with the leftovers. Be sure to get play sand labeled "sanitized" or
"sterilized", not the nasty stuff with critters still alive in it. You can put a
bit of Tak in the center part of the flanges at both ends to prevent the sand from leaking
out. As you pour the sand in the poles, it starts out very loose and will settle. To
accelerate this, smack the top of the pipe with an open palm. Forming an airtight seal
like that and forcing pressure toward the bottom makes the whole process go much faster.
My stands went from 9.5 pounds to 12 pounds after filling with sand, and they are much
quieter when I tap on them. Instead of a high pitched ring (never a good thing), I get a
dull thud.
Many commercial stands are made to be filled with
sand before deployment, and that proves to be a good idea with these home-brew stands as
well. A big 50-pound bag set me back $2.96, and now I have enough sand to start a small
beach with the leftovers. Be sure to get play sand labeled "sanitized" or
"sterilized", not the nasty stuff with critters still alive in it. You can put a
bit of Tak in the center part of the flanges at both ends to prevent the sand from leaking
out. As you pour the sand in the poles, it starts out very loose and will settle. To
accelerate this, smack the top of the pipe with an open palm. Forming an airtight seal
like that and forcing pressure toward the bottom makes the whole process go much faster.
My stands went from 9.5 pounds to 12 pounds after filling with sand, and they are much
quieter when I tap on them. Instead of a high pitched ring (never a good thing), I get a
dull thud. 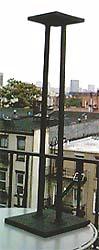 Just a hair over $70 total for
the higher performance version. Grab some black paint to cover the whole thing in and they
look fairly professional as well.
Just a hair over $70 total for
the higher performance version. Grab some black paint to cover the whole thing in and they
look fairly professional as well.